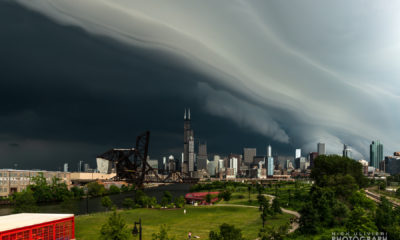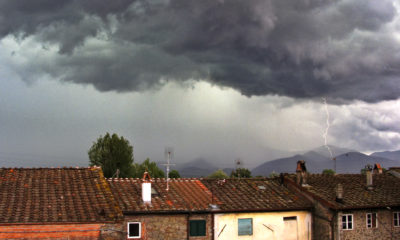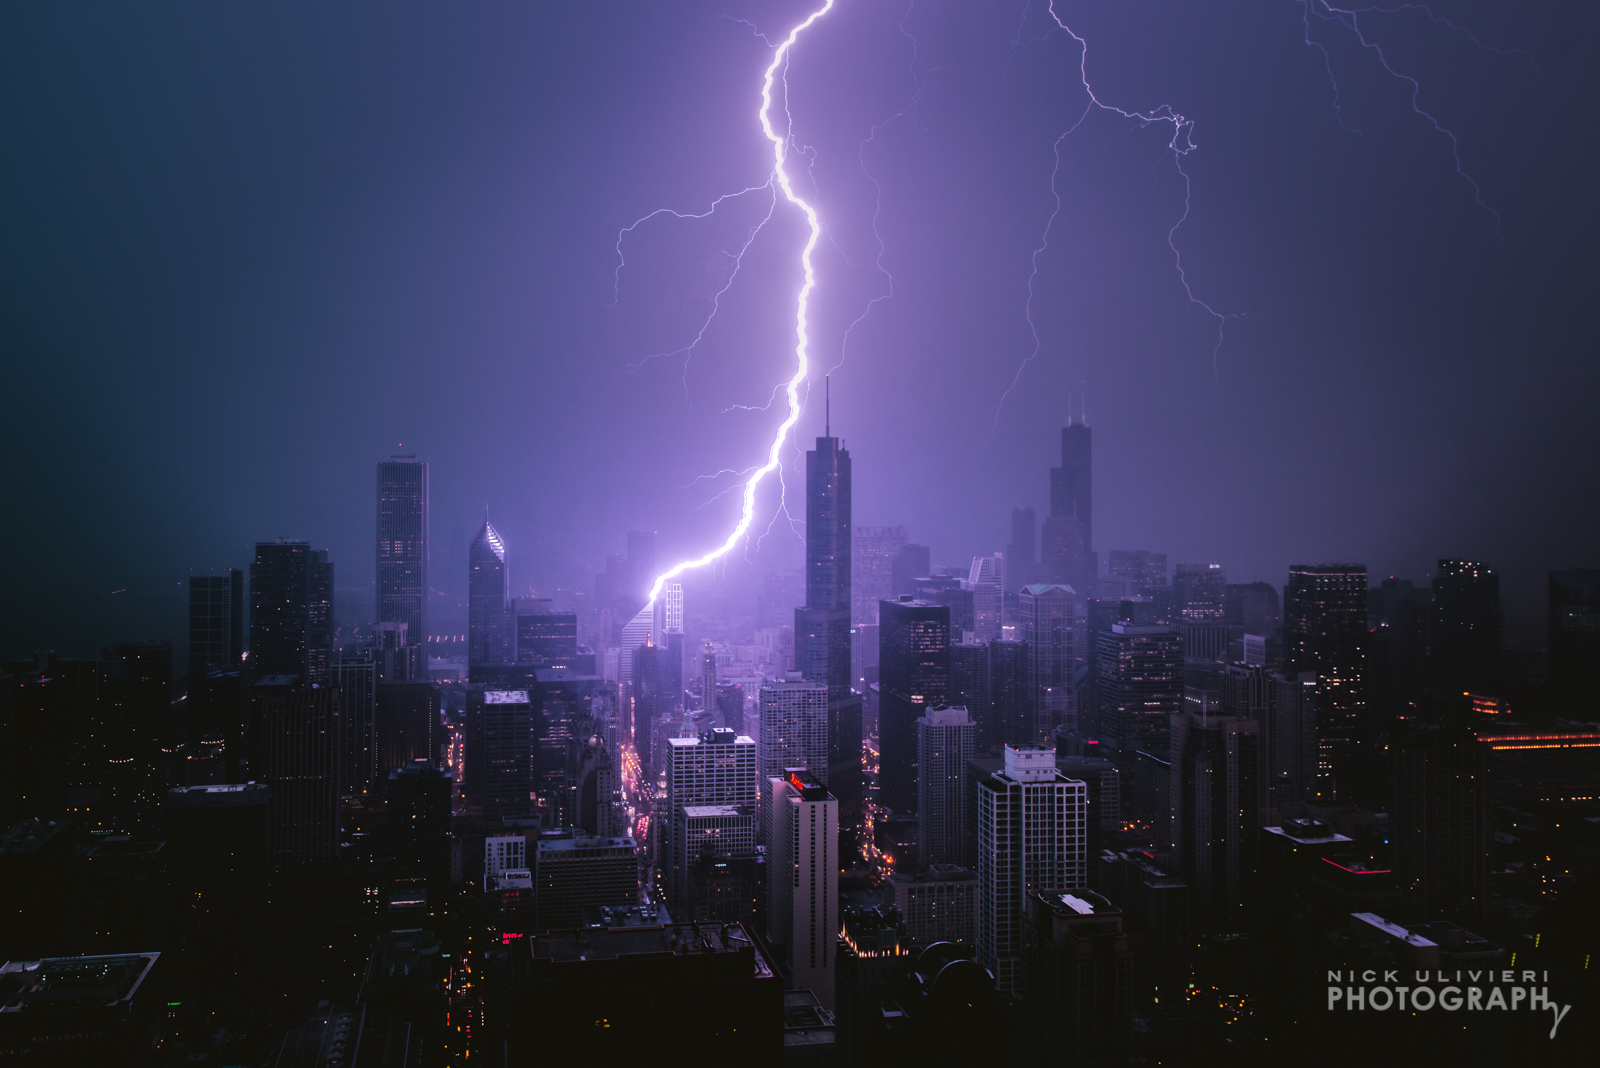
Lightning Photography | A Tutorial and Gallery
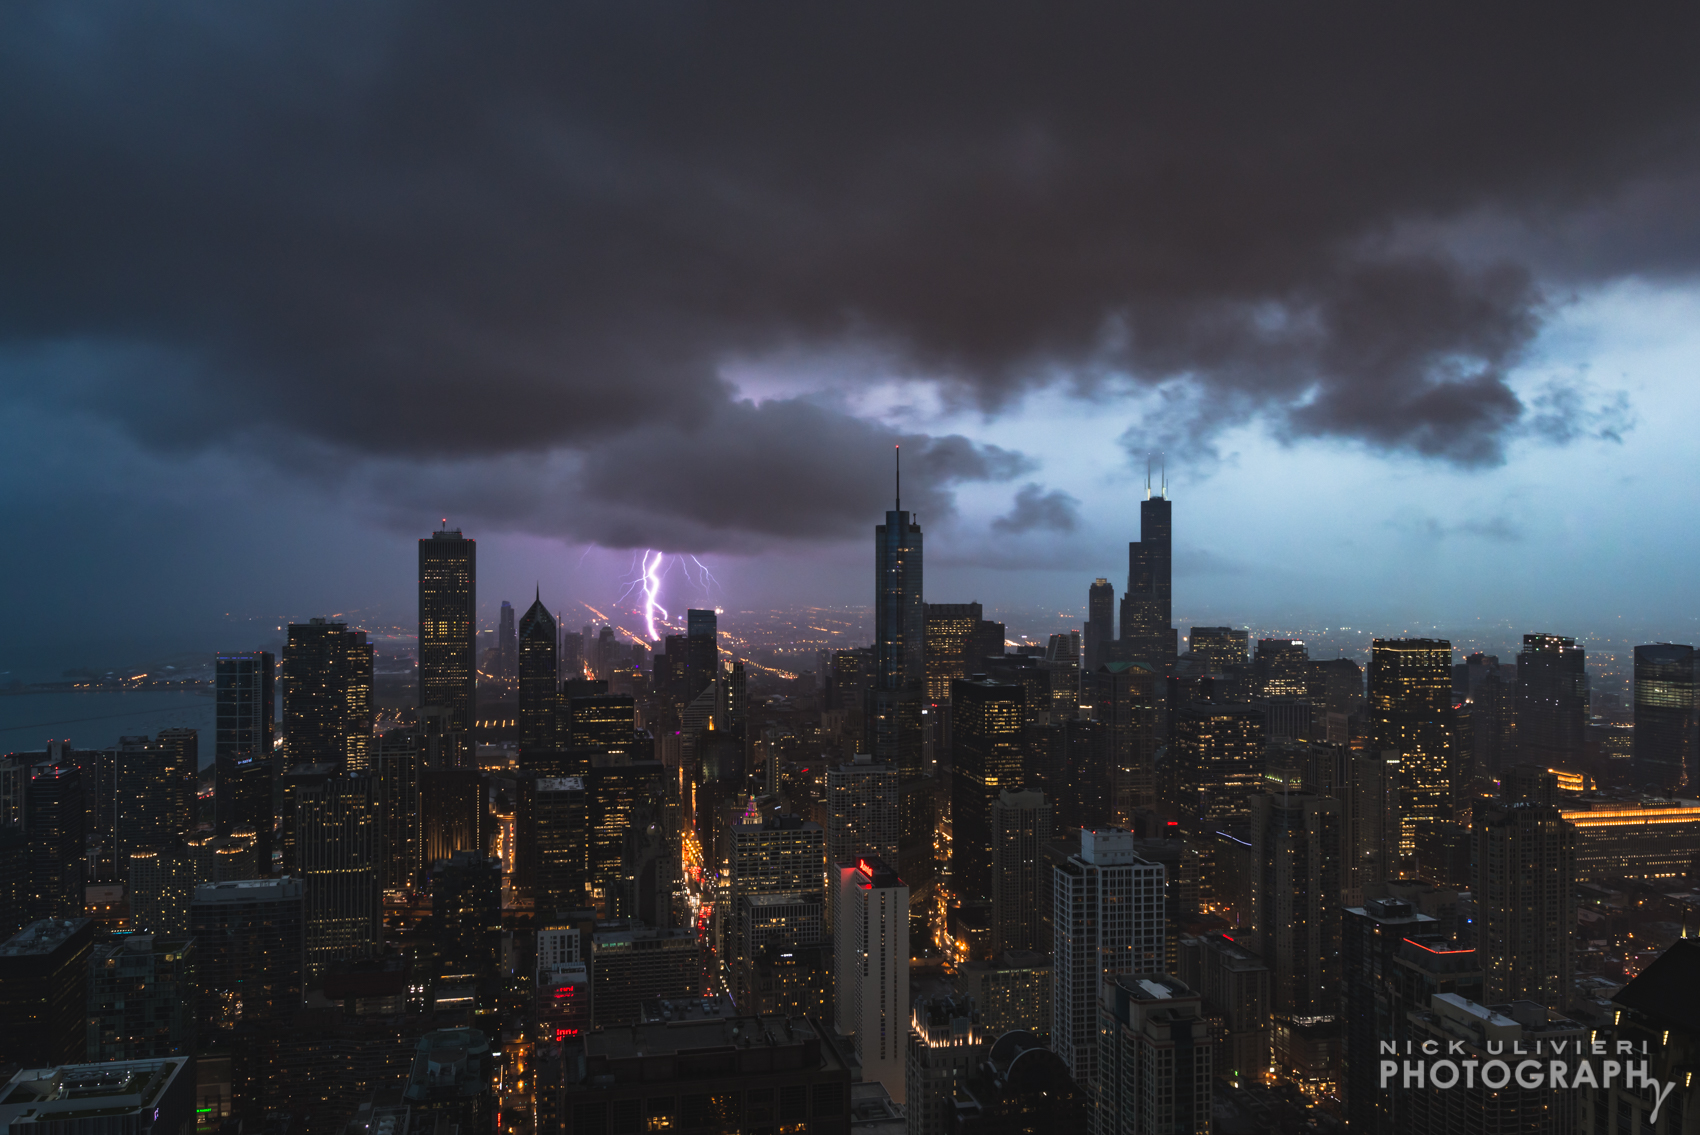
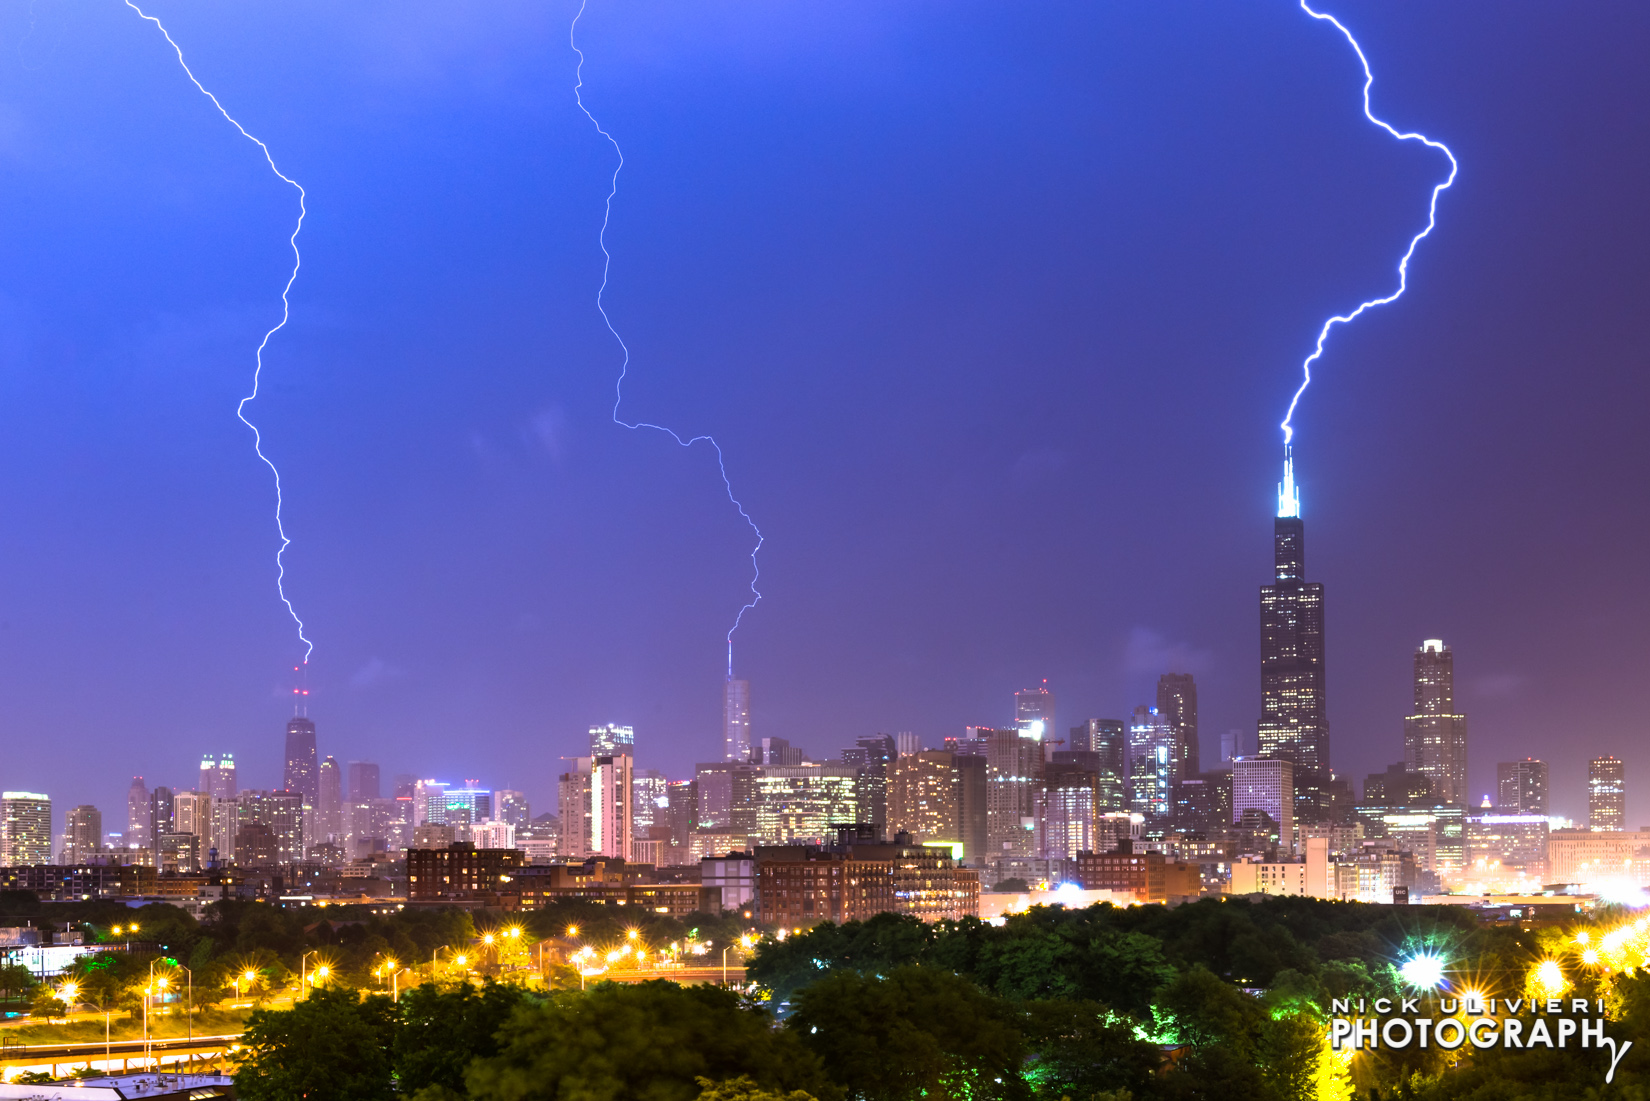
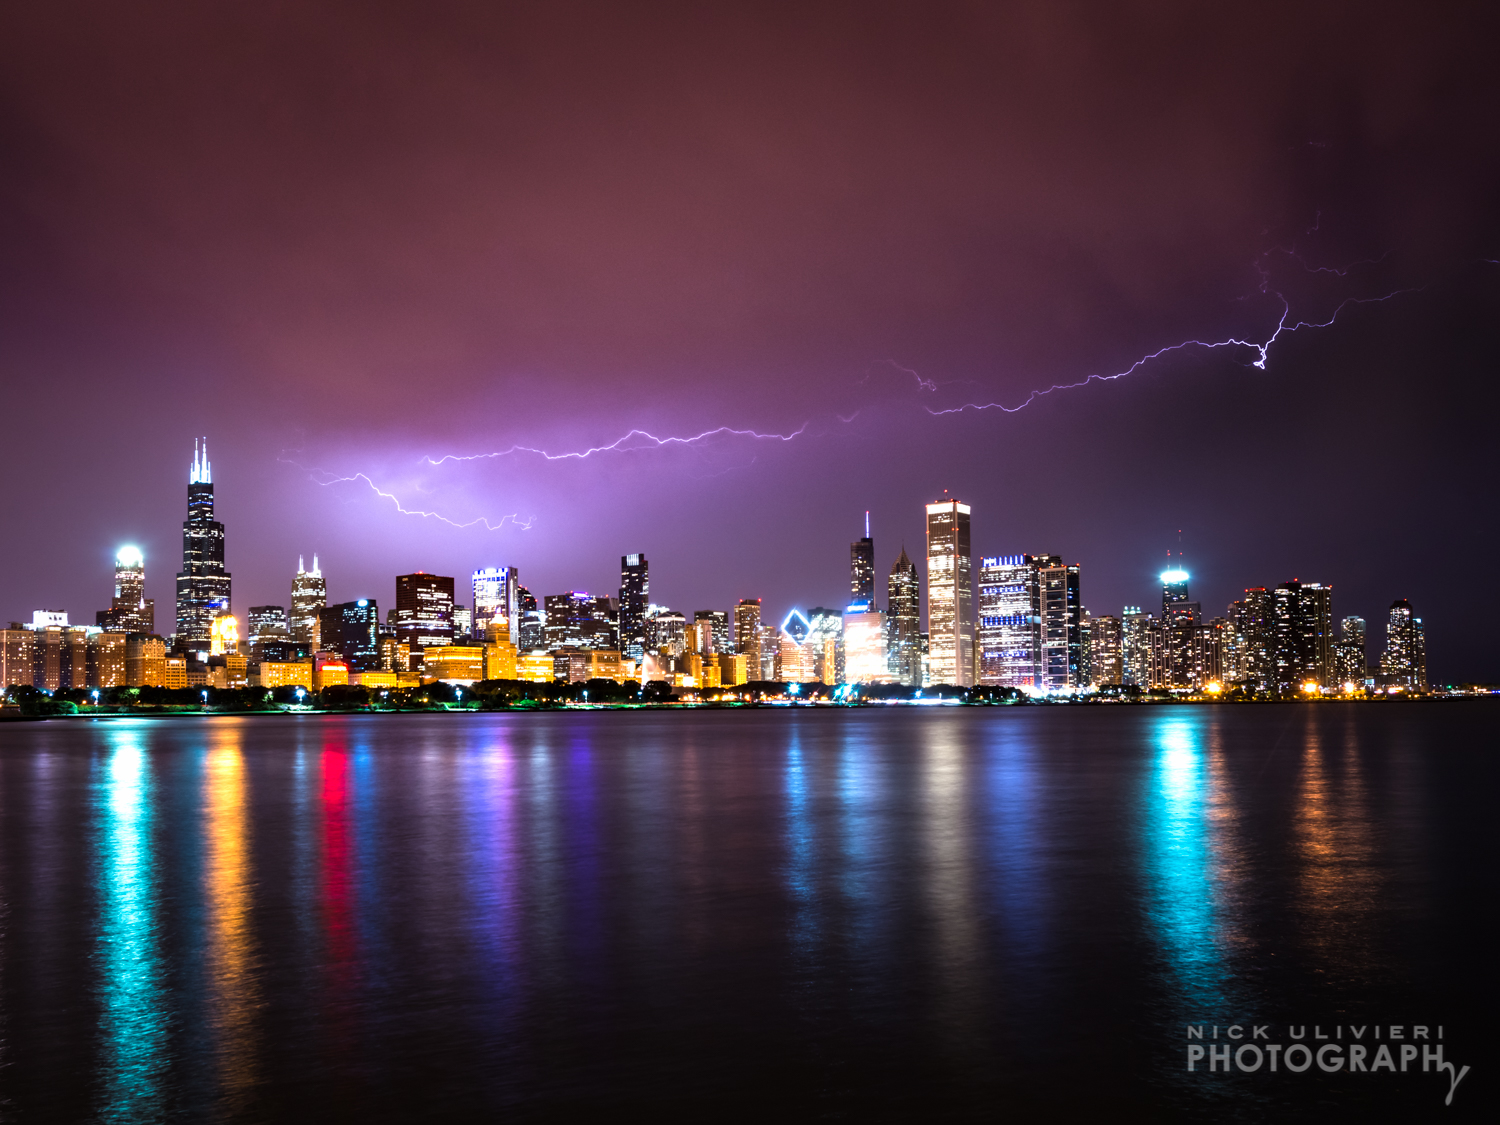
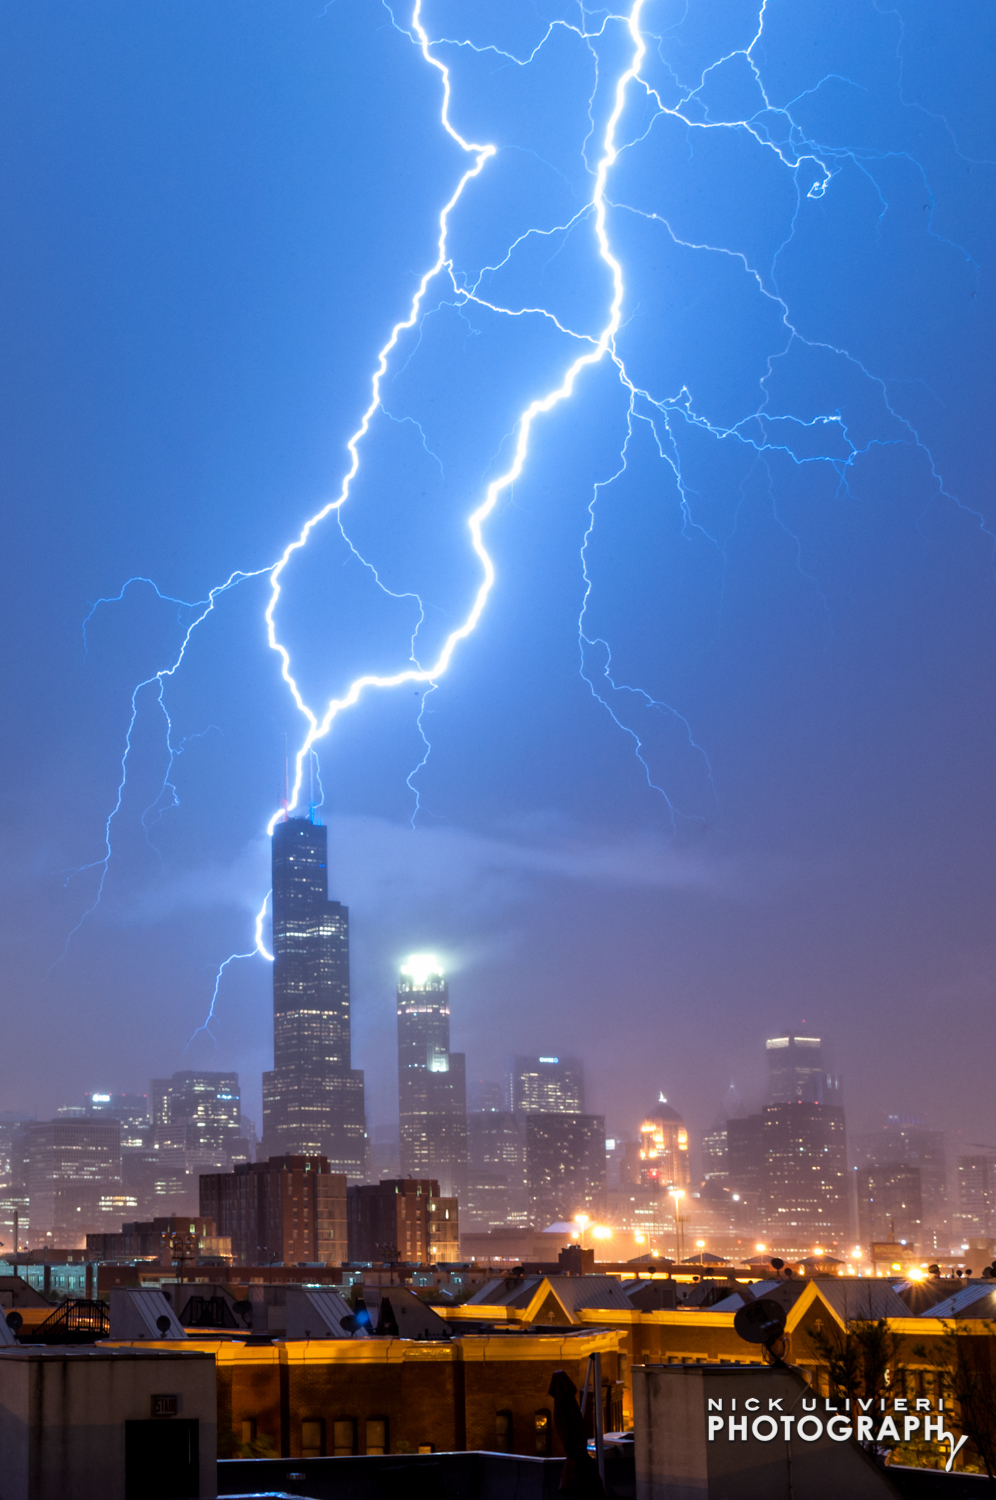
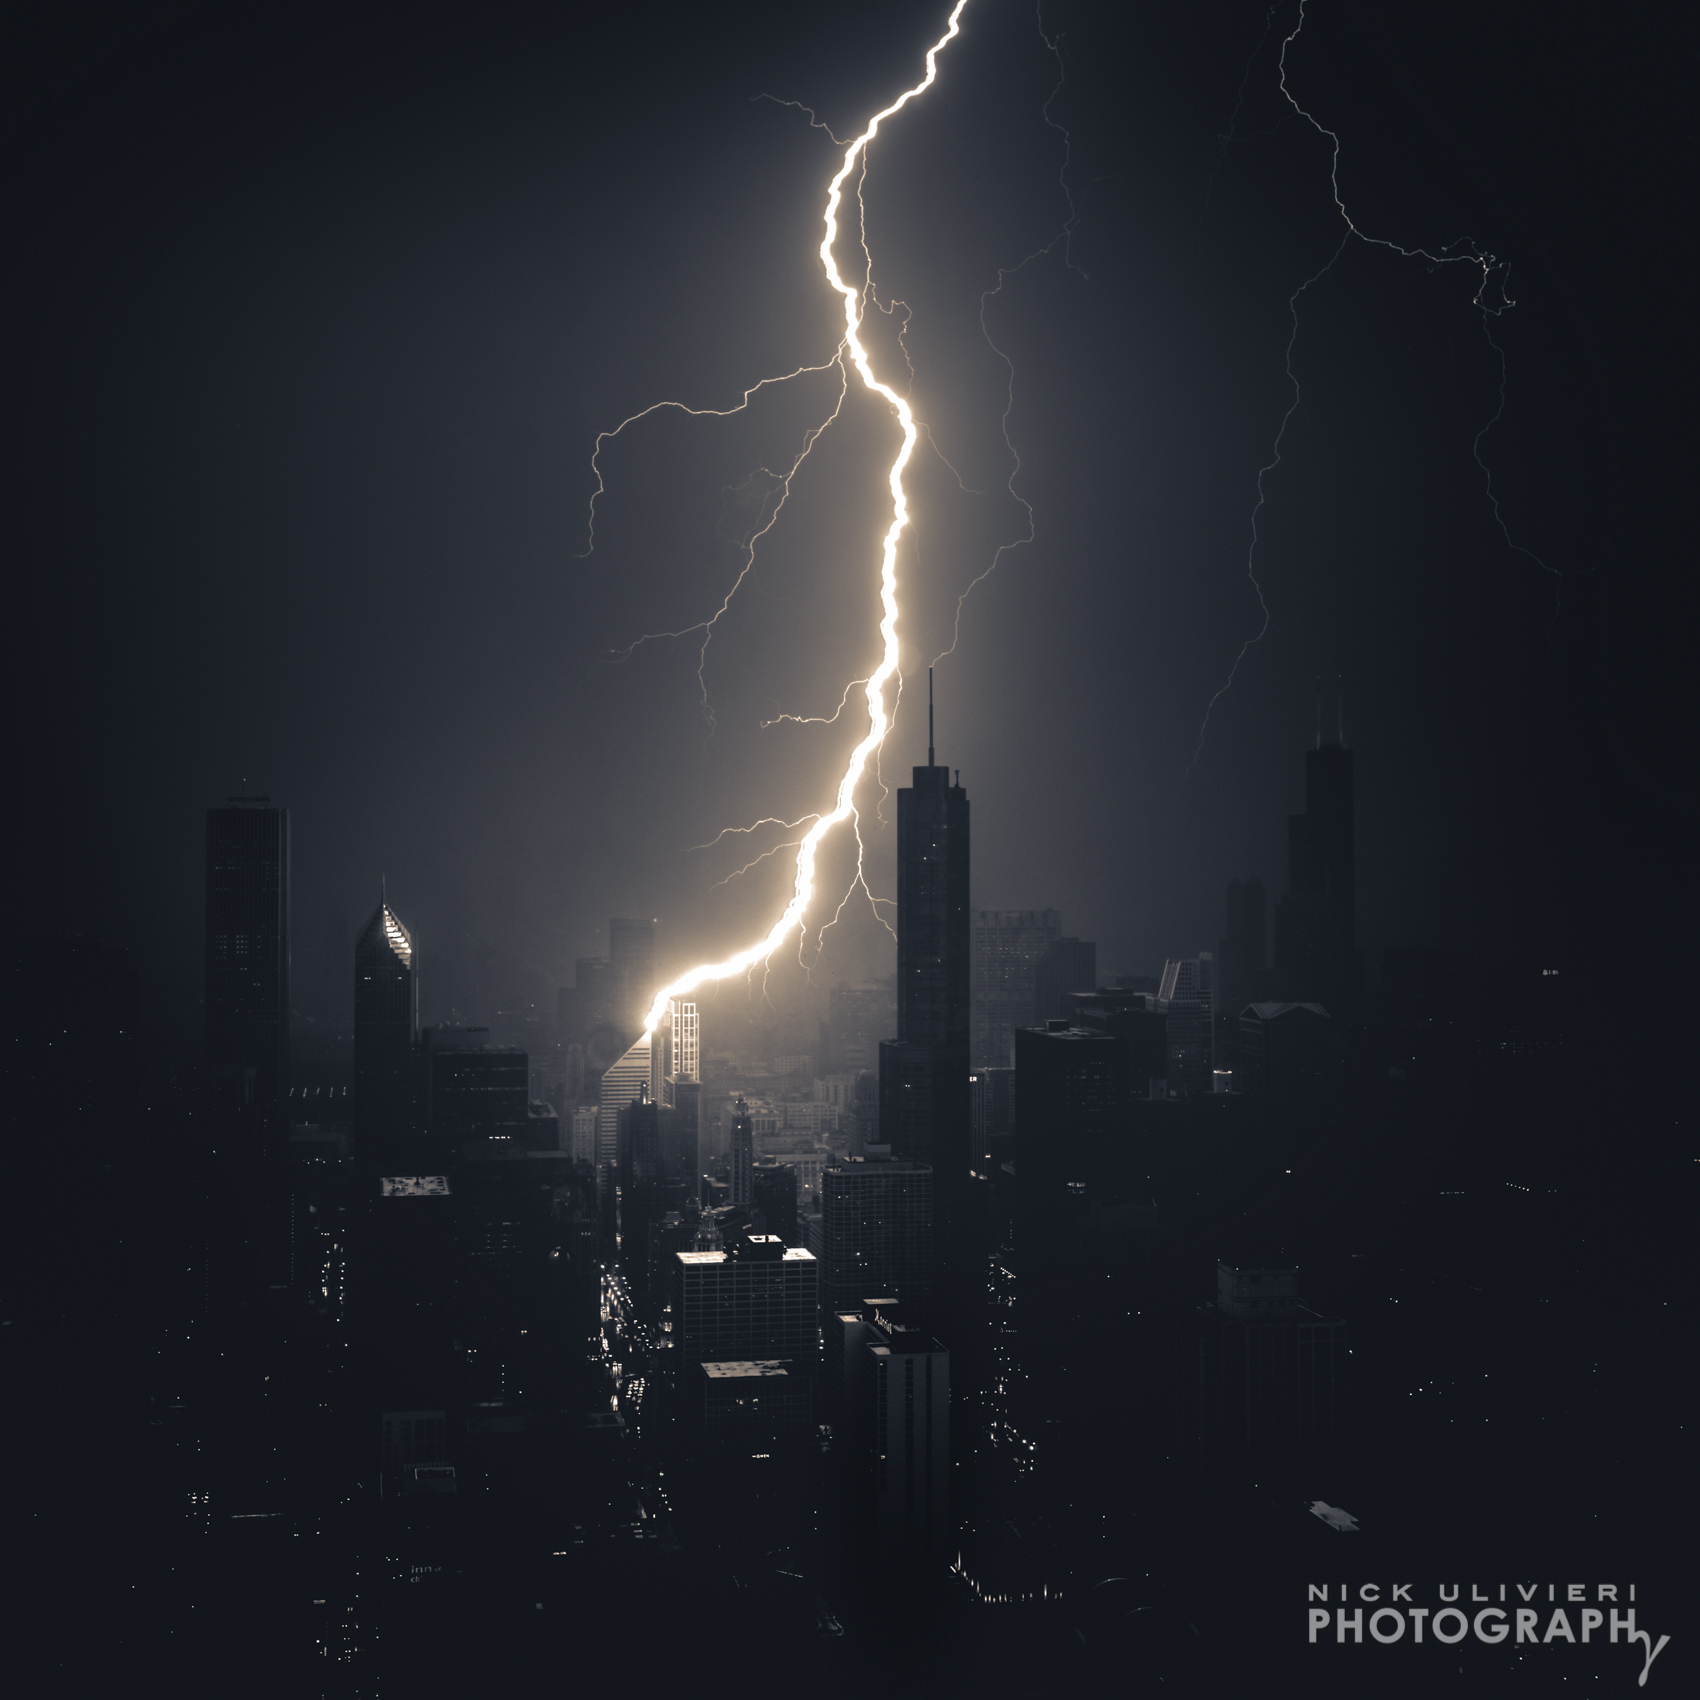
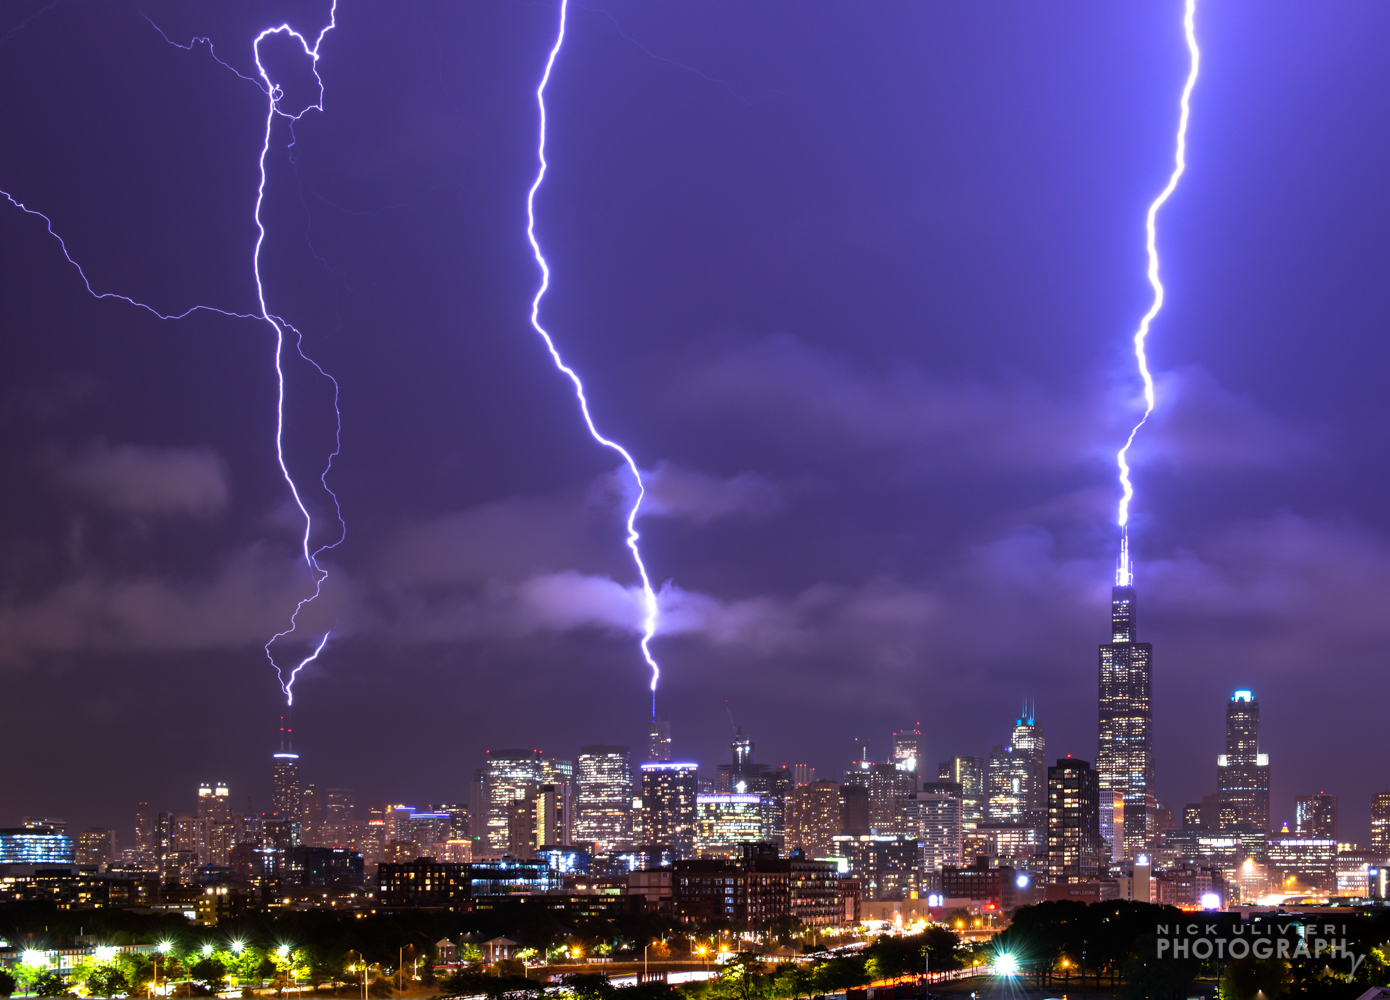
Nick Ulivieri | April 4, 2011 (UPDATED April, 2020)Lightning is an “atmospheric discharge of electricity accompanied by thunder… A leader of a bolt of lightning can travel at speeds of 22,000 mph, and can reach temperatures approaching 54,000 °F ” From: Wikipedia. The rest of the article has even more impressive stuff. It’s no wonder I’ve become so engrossed with observing and photographing this natural phenomenon. The first flash I see or rumble of thunder I hear gets my adrenaline going. Unfortunately, that also means I’m sometimes awake until 3 a.m. waiting for an approaching storm to let loose.
I originally wrote this post nearly 10 years ago, and while my techniques haven’t changed all that much, I did go back to clarify a few things and add a couple new bits of information I’ve since learned. Below the photo gallery are some of the settings, tips, and techniques I’ve used to capture this fleeting moment of visible electricity. And I’ll spoil the secret right here. You don’t need quick reflexes, or a lightning-sensing trigger. All you need is a continuous stream of long exposures! Simple in practice, long in patience.
I don’t cover the details of storm formation and prediction in this post, but I’ll say this, Radarscope is an incredible radar app that will help you anticipate lightning-producing storms. From here on out, the post assumes a photogenic storm is already roaming your area.
But before you try and capture lightning, I feel obligated to post some sort of safety disclaimer: Be safe, smart, and stay dry. And if your hair suddenly stands on end, it means you’re about to be struck by lightning. Read more: How to Protect Yourself From Lightning. Another mantra to consider: When thunder roars head indoors. With that out of the way, check out the tutorial after the photo gallery.

The Gear:
✶ Camera: This tutorial is geared towards interchangeable lens cameras, but any camera with basic manual settings can be used.
✶ Lenses: Wide to middle focal-length zoom lenses are perfect. You don’t need expensive, ‘fast’ lenses to capture lightning, either. An intro level kit lens will do just fine. I use my 24-70 most often, but I’ll also pop on my wide-angle, or even a telephoto depending on my creative goals and the distance of storm activity.
✶ Tripod: This is a must. If you don’t have a sturdy tripod, you can hang a weight from it to prevent a spill. Storms are usually accompanied by wind and you don’t want your set-up toppling over or your camera shaking while the shutter is open. If you do hang a weight on your tripod, make sure it is resting on the ground and connected to the tripod with a taught rope or cord. If the weight hangs freely, the wind can cause the weight to sway and generate unwanted movement of the tripod.
✶ Remote trigger: I highly recommend using a cable or remote release to fire your shutter. It makes for a more comfortable shooting position, and you can easily trigger the camera without physically touching the body and accidentally inducing unwanted shake. The one I use even has a lock so I can allow it to shoot continuously for moments at a time if I need to step away.
✶ Microfiber cloth/towel: To wipe away any drops on your lens or camera.
✶ Rain Gear…for you and your camera: Even if you’re on a balcony or under cover, dripping water, splashes, and wind driven droplets will find their way onto you and your camera. Something as simple as a clear plastic bag with a hole cut for the lens will suffice.
Note: There are no lightning triggers necessary for this technique!
Camera Settings:
✶ Manual Mode: Manual mode is crucial for successful lightning photography. The right mix of settings is key to catching the perfect bolt and the chances of your camera guessing correctly is unlikely.
✶ Aperture: Aperture is the key setting in lightning photography as it controls the brightness of the lightning bolt. If you’re comfortable using an off-camera flash, you’re already familiar with this concept. After all, lightning is like a giant speedlite provided by Mother Nature. My aperture sweet spot for bright, close bolts is around f/13, but it varies during the life of a storm. When the storm is still off in the distance, I may start with my aperture set to ~f/4 to catch the faint flashes within the clouds. But as the storm gets closer, and the bolts get brighter, I’ll gradually stop down until I’m shooting around f/13 for the big bolts dropping from the sky.
A general rule of thumb is this: Start with an open aperture while the lighting activity is distant and gradually close your aperture down as the storm gets closer.
✶ Shutter Speed: I generally shoot 8-15 second long exposures, though catching lightning is all about finding the right mix of settings that work best for your local conditions. Since I live in Chicago, I am inundated with light pollution. Lower storm clouds reflecting the city light can quickly become too bright if my exposure is too long. My main goal with shutter speed is to find a setting that gives me a slightly underexposed view of the landscape. I like to underexpose just a bit to create greater contrast between the cityscape/sky and the lightning bolt. In darker suburban and rural areas, longer shutter speeds are needed to capture foreground detail.
Bulb Mode: I’ve seen bulb mode recommend to capture lightning strikes, but I typically discourage this (unless you need exposures longer than what your camera’s maximum programmed shutter speed allows). The reason is this: If you wait too long for a bolt to strike, the scene may be over exposed. Conversely, if a bolt strikes a second or two into your exposure, you may excitedly close the shutter too soon and be left with an underexposed image.
It all comes down to consistency and repeatability for me. Using the exact same shutter speed (as conditions warrant) for a group of shots will yield consistent exposures. This will also allow you to more easily create panoramas or stacked lightning composites.
✶ ISO: Keep it low; usually under 200. Long exposures inherently add noise and I like to start off with the least amount of noise possible. The low ISO also helps keep bright bolts from becoming blown-out – especially the excruciatingly bright, close strikes. For all intents and purposes, ISO is also an easy setting to set and forget.
✶ Focus: Manually set your focus to infinity -or- auto-focus on a very distant subject, then switch your lens to manual focus. This is one of the more under appreciated parts of capturing lightning because it will allow your shutter to release instantly every time you trigger it. If you leave it in auto focus mode, you risk wasting precious moments while your lens hunts for a focus point.
Shutter Speed and Aperture work together!
While the above notes on my settings are general suggestions on where to start, your shutter speed and aperture must work in concert with one another. As the lightning intensity changes, you need to adjust both settings to compensate for the change in light entering your camera. When photographing lightning you’re dealing with two separate exposures; the exposure of the ambient light of your landscape AND the exposure of the lightning itself. As I mentioned above, your aperture controls the intensity of the flash and your shutter speed controls the ambient light of the scene.
Here’s an example. Say I’m photographing a normal nighttime cityscape at 6-seconds and f/6 and the resulting exposure is perfect. If I shoot that same scene, with the same settings, while a close bolt of lightning strikes, what might happen? The bolt will likely be totally blown out, and the cityscape could be overexposed if the lighting overpowered the ambient light. So how would you fix this? First, you need to close down your aperture to lessen the amount of light coming in from that lighting strike. Then you’ll also have to increase your exposure time so your landscape is properly exposed, too. If you only close down your aperture, and don’t adjust your shutter speed, the landscape will be too dark.
To put it another way, the lightning bolt’s intensity needs to be choked down by a smaller aperture to preserve the details of the bolt itself. The longer exposure setting will allow your sensor more time to gather the ambient light of the scene your shooting. The opposite is true when the lightning is farther away and less intense: You’ll need a faster shutter and larger aperture.
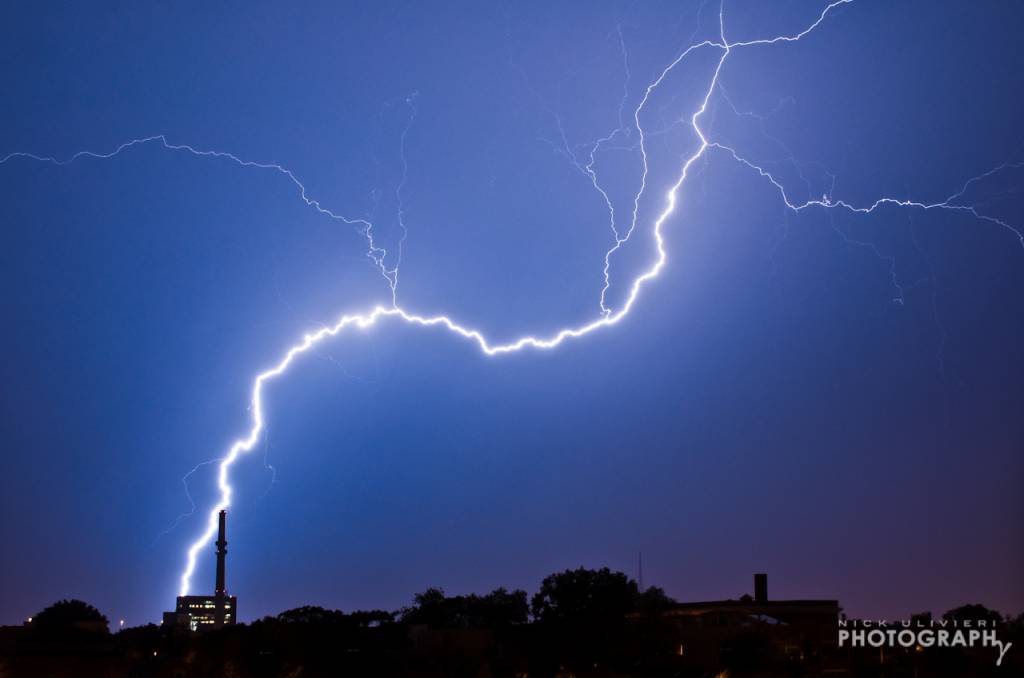
lighnting intensity & Variability:
I don’t want to spend too much time in this post describing the technical difference between lightning types – partly because I’m not an expert – but one thing I will say is that no two bolts are alike. The comparative figure below illustrates this point. These images were both taken in 2013 on different nights, but from the same location. Despite the same shutter speed of 10 seconds, the right-hand photo boasts a slightly higher ISO, and a larger aperture. You’d think that photo would be brighter since the camera was set to gather more light. But the lightning in the left frame is far more intense. Considering the information in the previous section, the below results seem contradictory. What gives?
While the clearer atmosphere plays a small part, the type of the lightning itself is what makes a difference. The left-side bolt is a positive strike, while the right-side bolt is a negative strike. Positive lightning originates at the top of a thunderstorm, and is far stronger (and brighter) than negative lightning because it takes much more charge to bridge the gap between the top of the storm and the ground (or antenna). Conversely, negative bolts originate from the lower-level clouds nearer the thunderstorm’s base and therefore don’t require as much energy to make the shorter jump.
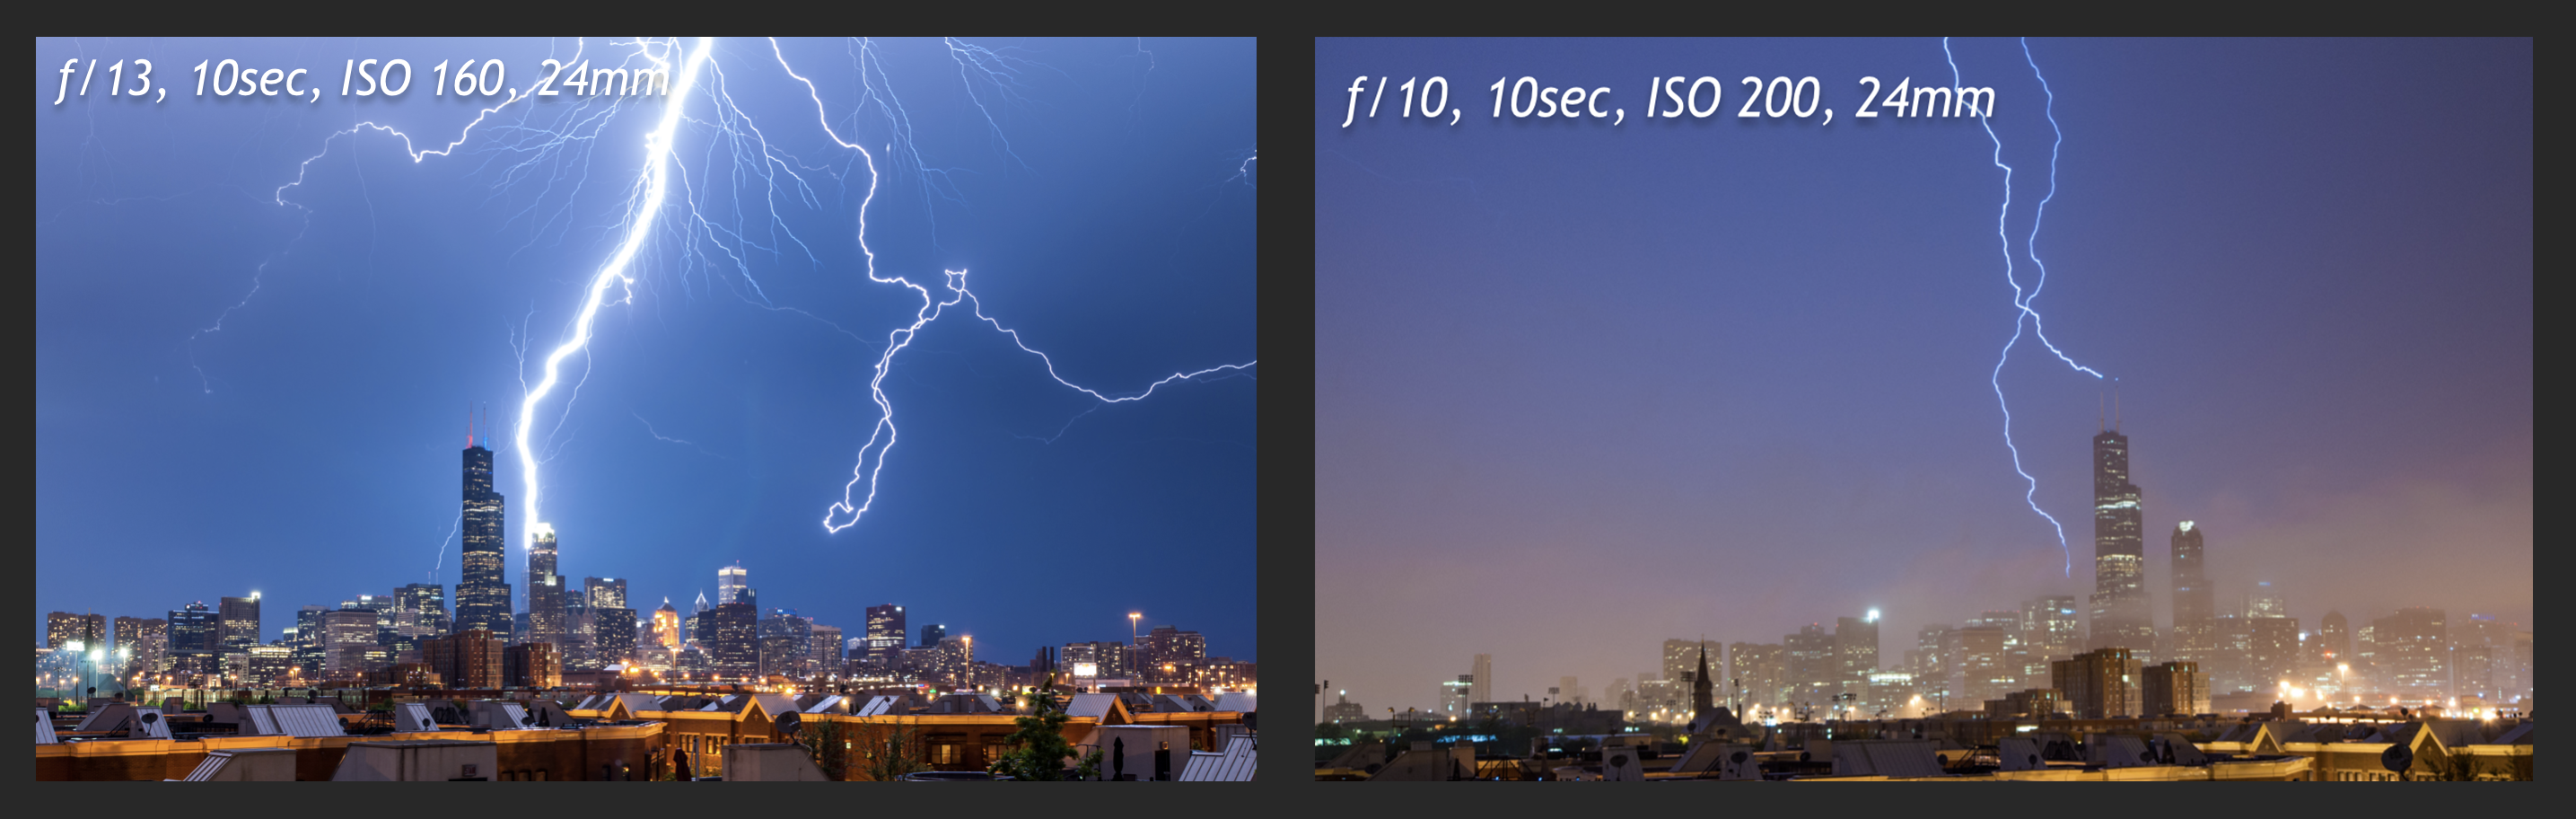
While any thunderstorm can have a mix of lightning types, positive cloud-to-ground strikes are the most impressive, but unfortunately, the most rare. While negative cloud-to-ground strikes are more numerous than positive strikes, the majority of lightning activity in a storm is intracloud; the type that lights up a cloud, but doesn’t produce a well-defined, ground-connecting bolt. Generally speaking, the stronger the storm the higher your chances of seeing big, booming positive strikes, but it’s not guaranteed. A lot of luck is required to catch a good bolt of lightning. The more storms you watch and shoot, the better you’ll adapt your techniques to capture them.
Shooting advice & tips:
1. Fire away! Once you’re set-up, the key is to keep shooing. Take as many frames as you can in rapid succession. Don’t wait for the lightning to strike before firing your shutter, you’ll probably miss it. The goal is to capture the lightning strikes while the shutter is already open. It’s a game of numbers, really. The more often your shutter is open to the sky, the more likely you are to catch a bolt when it strikes.
2. Regularly check local weather reports, follow meteorologists on social media, and use Radarscope to get a better idea of when a storm will arrive, the general direction it will be coming from, and the storm’s severity. Research storm formation and lightning generation. The more you know about your subject, the better you’ll be able to capture it. Know what’s approaching before you venture out!
3. Position yourself into the storm to capture the lightning as the storm approaches. The most crisp bolts are captured when there isn’t a heavy amount of rain between you and the lightning. My rule of thumb: If it’s already raining heavily it’s not necessarily too late. Stay inside and wait until after the rain passes, and you might catch some good lightning in the clear air on the backside of the storm as it departs the area. Oftentimes you’ll get some nice big positive strikes in this area of the storm, too.
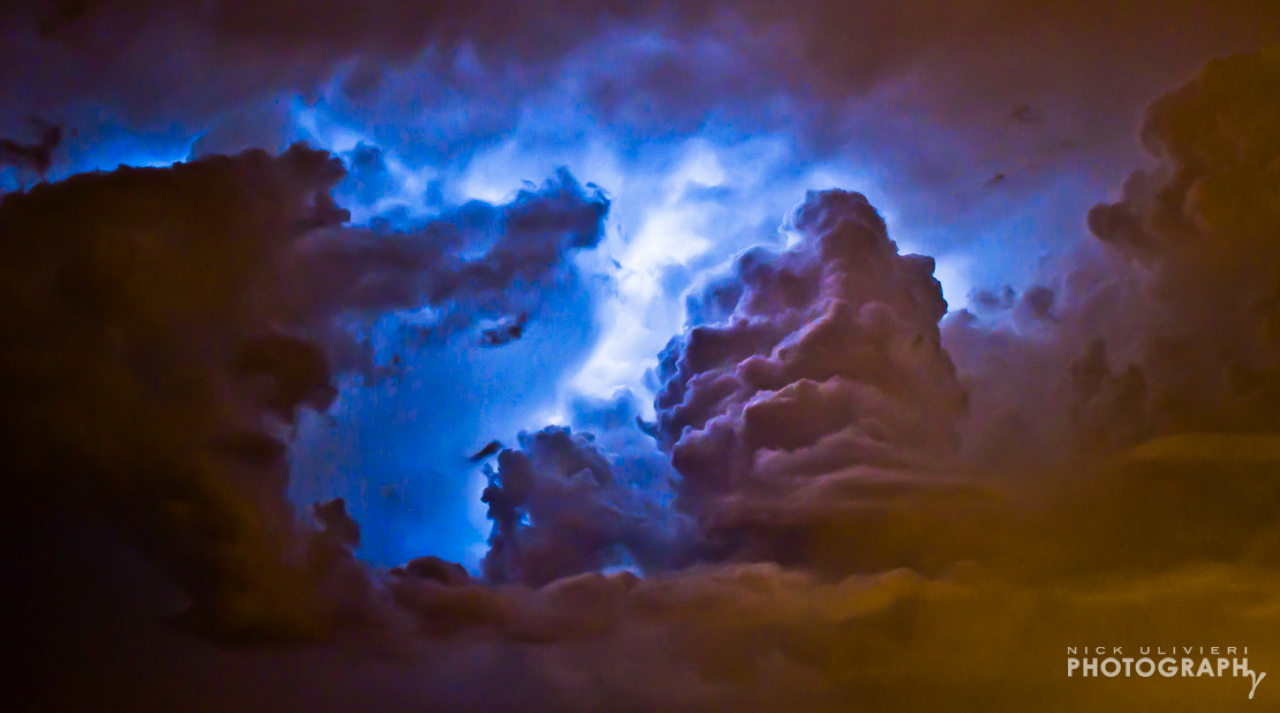
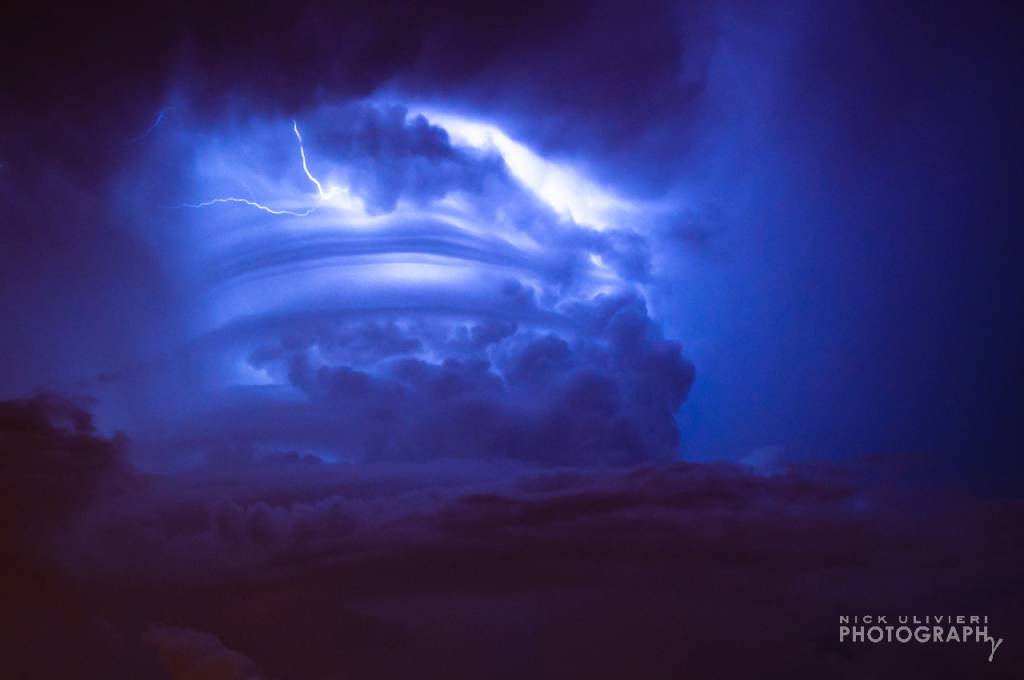
4. Wide-angle shots are great for starters, but don’t be afraid to switch it up. A wide-angle lens will cover more sky, which means more chances to catch lightning as it flashes. But if the lightning isn’t very close, it might appear quite anemic in the wide-angle frame. Once you’re comfortable with managing your settings to properly capture lightning, start zooming-in and/or composing your shots more creatively. Instead of shooting extra wide to capture every flash, focus on creating a couple great, varied shots during the life of a storm. Don’t be afraid to throw on a telephoto and zoom way into a storm cloud. You might be surprised at the texture and detail you can capture when the cloud is lit from within.
5. Don’t “set it and forget it.” It’s easy to set-up your camera, dial in your settings, and let it run on it’s own, but if you aren’t there to adapt to the changing conditions you may be disappointed by the results. Storm clouds move quickly and the area of the most intense lightning changes fast. The entire storm system is a constantly evolving mix of lighting conditions and you need to adapt your settings to those changes.
6. Do not go through and delete missed shots! Learn from my early mistakes. I can’t tell you how many bolts I’ve missed when I was hurrying to delete the bad shots. Memory cards are large enough these days that you shouldn’t run out of space during a single storm. That said, you should quickly review bolts you do catch to ensure your settings are good.
7. Re-check your focus! Since you set it manually when you started shooting, it can be easy to forget. But if you switch lenses or adjust your focal length, don’t forget to double-check your focus!
8. Post processing: I post-process all of my lightning shots in Adobe Lightroom. I do most of my post processing to bring out the intricate details in the clouds. The gradient tool coupled with the clarity slider are your best friends for teasing these details out. I also rely on the highlight slider to help reign in extra-bright bolts. Due to the light pollution, I often find myself with a lot of reds/yellows/magentas apparent in the clouds, offset with heavy blues in the bolts.
Trying to find the perfect white-balance is tricky with different light sources/color temperatures. Instead of trying to mitigate this, I embrace it and make it a contrasting color element of my images. Lightning lasts for such a brief second in time that it’s hard to know for certain what the scene “truly” looks like so have fun with it.
9. With great power comes great responsibility. Snapping off hundreds, or thousands, of shots is easy – especially when trying to capture lightning. If you happen to catch a good storm with a lot of activity, take a breath before you upload every photo that has the slightest bit of lightning in it. Edit them down so that you have a concise, yet varied set. A handful of great photos is more memorable to your viewers than if those same great shots are sprinkled in amidst a mass of mediocre images.
10. The key here is patience. Sit outside, enjoy the storm rolling in, and just keep firing your shutter. The best feeling is hitting the trigger then seeing the bolt a second or two after you hear the shutter open. It nearly guarantees you’ve captured a strike. Each storm will vary in the type of lightning it produces, the intensity, and the amount of strikes. You just need to practice, experiment, and exercise patience…which isn’t necessarily easy when you’re counting on mother nature to give you the ideal light show.
Good Luck, happy shooting, stay dry, and most importantly…don’t get struck! Have questions? Shoot me an email >> nick@nuphoto.com
Quick guide:
Shutter speed: Start around 8-10 seconds
Aperture: f/13
ISO: Low, < 200
Focus: manual focus to infinity -or- auto-focus on distant object, then switch to manual
Check out my updated, and ongoing, storm photography GALLERY